

Does Roborio Firmware Need Be Updated For 2019 Frc
As of this writing:
- The Commuter Station must show version 22.0 or later on in the championship bar.
The latest DS is office of the FRC Game Tools that can be downloaded from National Instruments. - RoboRIO must be imaged to 2022_v4.0 or subsequently.
You can come across the image version within the Driver Station on the Diagnostics Tab.
The newest image and Imaging software are likewise in the National Instruments Game Tools. - The latest version of WPILib and Visual Studio Lawmaking for Coffee and C++ developers is 2022.four.ane. The latest version tin can e'er be downloaded from the WPILib Github Release page. This release works with the latest RoboRIO image version, so you'll need to update everything.
- The GradleRIO version will be 2022.4.one in your
build.gradlefile. The Visual Studio Code plugin should automatically offer to update your GradleRIO version. - Teams should go through all their components to make sure the firmware is upward to appointment.
RevRobotics components should be updated with the REV Hardware Client.
CTRE components should be updated with the Phoenix Tuner. - The 2022 Inspection Checklist is available online.
If yous are headed to a competition, please update all your software before the result.
Notes from Duluth
The 2022 Northern Lights Regional and Lake Superior Regional were both held at the Duluth DECC. Pit areas for both were in the aforementioned large room, which fabricated it easier for CSAs to assistance out teams from both regionals.
- As usual, the most common problem was with teams whose RIO epitome, Commuter Station, or GradleRIO were non up to date. Unremarkably updating the RIO epitome would then require that WPILib and VS Code would also need an update.
- Imaging the new RIO 2s typically required that the SD chip be popped out then imaged with Etcher. After the SD bit was written, the imaging tool must be used to set up the team number.
- I saw fewer issues with cameras than in past events. At that place were a few calls for LImeLight questions, which were handled by CSAs that are LimeLight experts.
- There were a couple problems caused past metal shaving shorting out PWM pins.
The WPILib command framework divides your robot program into two types of classes: subsystems and commands. The subsystem classes stand for the major physical parts of the robot, such as a shooter subsystem, a drive-train subsystem, or a manipulator arm subsystem. The command classes define the actions taken by the subsystems, such equally shooting a ball, moving the drive-train, or raising the manipulator arm.

Most of your programming time will go into creating, refining and debugging new commands. Commands will be the about sophisticated office of your code. Therefore they likewise have the greatest adventure of going wrong. Therefore yous should spend a lot of fourth dimension testing your commands.
So far we have tested simple functions and verified the primitive functionality in subsystems. The next step is to created automatic tests for your commands.
Testing a simple Command
Our unproblematic example robot contains a Shooter subsystem that shoots balls. The ShooterSubsystem has a high-speed bicycle for throwing the ball, and a servo arm that tin can heighten the ball up until information technology touches the cycle. Nosotros volition need a command to set the wheel speed, and another to control the servo arm.
A unproblematic Command
Here is the command to raise or lower the servo arm:
package frc.robot.commands; import edu.wpi.first.wpilibj.experimental.command.*; import frc.robot.subsystems.*; public form ShooterServoArmCommand extends SendableCommandBase { private concluding boolean fire; private final ShooterSubsystem shooter; public ShooterServoArmCommand(boolean fireArm, ShooterSubsystem shooterSubsystem) { fire = fireArm; shooter = shooterSubsystem; addRequirements(shooter); } @Override public void execute() { if (burn) { shooter.fire(); } else { shooter.retract(); } } @Override public boolean isFinished() { return truthful; } } Have note of the two parameters on the constructor: fireArm and shooterSubsystem. This control can either enhance the arm or lower it, depending on whether the fireArm parameter is true or faux.
Past specifying the shooterSubsytem in the constructor we are using Dependency Injection, which makes the lawmaking more than reusable and more than testable. When testing, nosotros can replace the real subsystems with mock objects that false the subsystem'southward functionality.
A simple Test
Our task does two different things: retract and burn down. First let's test that firing the brawl works:
package frc.robot.commands; import edu.wpi.commencement.wpilibj.experimental.command.*; import frc.robot.subsystems.*; import org.junit.*; import static org.mockito.Mockito.mock; import static org.mockito.Mockito.verify; public class ShooterServoArmCommandTest { private CommandScheduler scheduler = zip; @Earlier public void setup() { scheduler = CommandScheduler.getInstance(); } @Examination public void testFireArm() { // Arrange ShooterSubsystem shooter = mock(ShooterSubsystem.class); ShooterServoArmCommand fireCommand = new ShooterServoArmCommand(true, shooter); // Act scheduler.schedule(fireCommand); scheduler.run(); // Assert verify(shooter).burn down(); } } The test follows our Arrange / Act / Assert pattern:
- We create a mock version of our ShooterSubsystem. If nosotros wanted, nosotros could besides define some mock behaviors at this signal.
We create the actual command nosotros will test. In this case nosotros set the fireArm parameter to truthful, indicating that nosotros want to fire the ball. - In the control framework, nosotros never explicitly execute the command methods. Instead, we "put it on the schedule". Afterward this, the command scheduler will run the methods appropriately. On a existent robot, the scheduler tries to run all scheduled commands every 20 milliseconds.
In this case we know that our command will simply run one time before it'south done. - At the end of the test, we ask the mock framework to verify that the shooter's "fire" command was called exactly once.
Unit tests will all execute whenever nosotros build the code. Become ahead and execute the "Build Robot Code" action within Visual Studio code. Next write a similar exam to verify that the control too correctly retracts the servo arm:
@Test public void testRetractArm() { // Arrange ShooterSubsystem shooter = mock(ShooterSubsystem.class); ShooterServoArmCommand retractCommand = new ShooterServoArmCommand(false, shooter); // Human action scheduler.schedule(retractCommand); scheduler.run(); // Assert verify(shooter).retract(); } Testing a Command Group
Uncomplicated commands can be grouped together to run sequentially or in parallel as more than complicated commands.
A more complex Command
For instance, actually shooting a ball is a sequence of steps:
package frc.robot.commands; import edu.wpi.beginning.wpilibj.experimental.command.*; import frc.robot.subsystems.*; public course AutoShootCommand extends SequentialCommandGroup { public AutoShootCommand(ShooterSubsystem shooter) { super( new PrintCommand("Brainstorm: AutoShootCommand"), new ShooterServoArmCommand(simulated, shooter), new ShooterSetSpeedCommand(1.0, shooter), new WaitCommand(0.5), new ShooterServoArmCommand(true, shooter), new WaitCommand(0.5), new ShooterSetSpeedCommand(0.0, shooter), new ShooterServoArmCommand(false, shooter), new PrintCommand("Cease: AutoShootCommand") ); } } Note that nosotros are again using dependency injection, but that the same ShooterSubsystem will be used in all the internal commands.
Besides the shooter commands, we've also thrown in a couple of PrintCommands. These commands print out to the console at the beginning and cease of the command. They also print to the Log File Viewer to be reviewed later on a match.
Also we've thrown in a couple of WaitCommands, which give the shooter wheel one-half a second to spin up before shooting and then maintain speed while the brawl is firing.
Testing a Control Group
A command grouping exam follows the aforementioned design as simpler tests:
packet frc.robot.commands; import static org.junit.Assert.*; import static org.mockito.Mockito.*; import org.junit.*; import edu.wpi.beginning.wpilibj.experimental.control.CommandScheduler; import frc.robot.subsystems.ShooterSubsystem; public class AutoShootCommandTest { private CommandScheduler scheduler = nothing; @Before public void setup() { scheduler = CommandScheduler.getInstance(); } @Test public void testShoot() throws InterruptedException { // Accommodate ShooterSubsystem shooter = mock(ShooterSubsystem.class); AutoShootCommand command = new AutoShootCommand(shooter); // Act scheduler.schedule(command); for (int i=0; i<100; i++) { scheduler.run(); Thread.sleep(20); } // Assert verify(shooter, times(2)).retract(); verify(shooter, times(1)).burn(); verify(shooter).setSpeed(1.0); verify(shooter).setSpeed(0.0); } } This command takes many run cycles, then run it many times, pausing 20 milliseconds between each execution.
After executing everything in the command group, we verify that the subsystem experienced all the actions for shooting.
Writing quality tests
It'due south of import to remember why we practice unit testing.: we create suites of automated tests to improve the quality of our software. Writing quality tests is a large field of study and these last three manufactures have covered a lot of ground. It would exist easy to be overwhelmed, or in fact dubious, with all of this. And so go on your eye on the end goal: software quality.
In a sense, writing methodical tests is a stepping stone from just programming into Software Engineering science. Engineering ways using systematic and disciplined practices when creating things. Your tests will verify and quantify your software quality, in manner that others tin read and evaluate.
Further Reading
- JUnit documentation
- Mockito documentation
- Command Based Programming for WPILib
-
Unit of measurement Testing: The Expert, Bad, and Ugly
Testing is an element of any software development, and certainly it's a big part of robot programming. Y'all've probably already done a lot of robot testing; deploy your code and test the robot. Hopefully you're already familiar with the idea of unit testing of small functions, but we tin can also automate the testing of whole subsystems.
Unit testing with WPILib
To demonstrate automated testing of robot subsystems, nosotros'll apply a simplified robot program. This program runs on a real robot build for the 2016 game, Starting time Stronghold.
A simple subsystem
In the WPILib command design a subsystem course represents a concrete subset of the robot. A subsystem contains physical components, such every bit motors and sensors. There will be deportment to perform on the subsystem, such as to drive or shoot. For this case, we have a simple robot with ii subsystems representing the robot chassis with its drive motors, and a shooter for throwing assurance.

Mostly nosotros're going to work on testing the ShooterSubsystem. The shooter has two components: a motor attached to a spinner cycle and an arm attached to a servo that manipulates the ball. To shoot a ball we will:
- Retract the servo arm so we tin can pick up a brawl.
- Start the shooter wheel spinning.
- Extend the servo arm then the ball is pushed into the wheel. The ball volition go flight.
- Reset the organisation. The wheel volition exist stopped and the servo retracted.
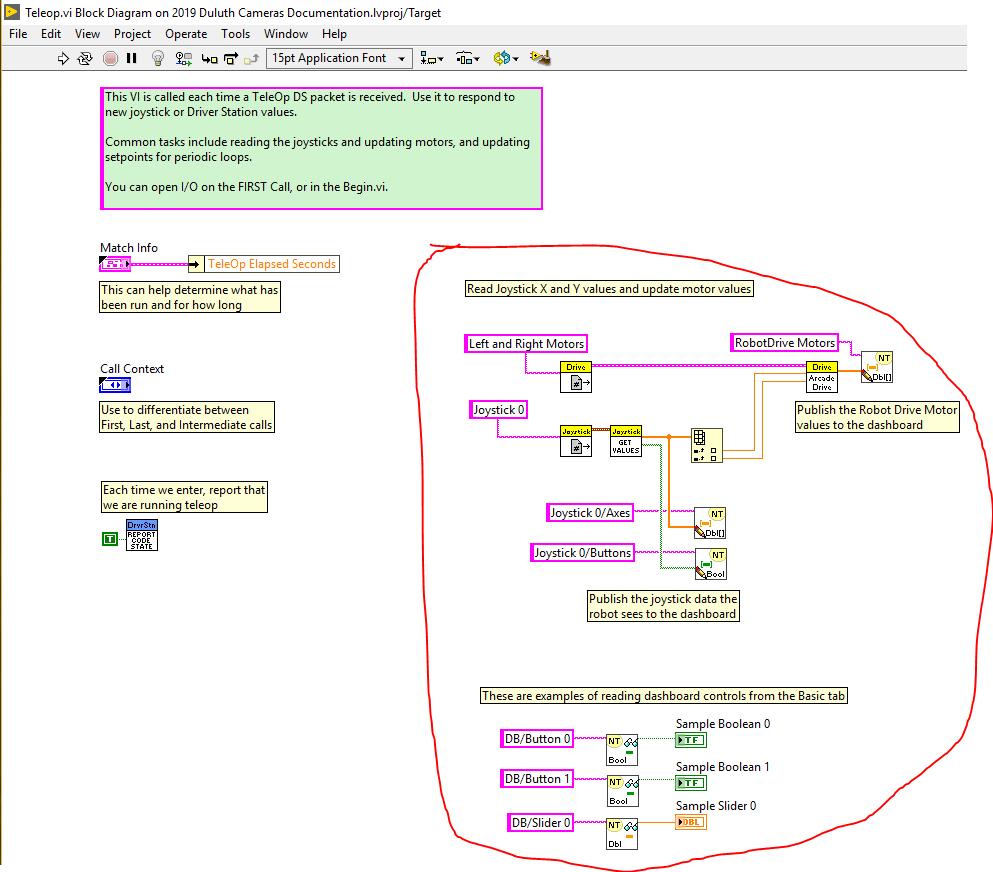
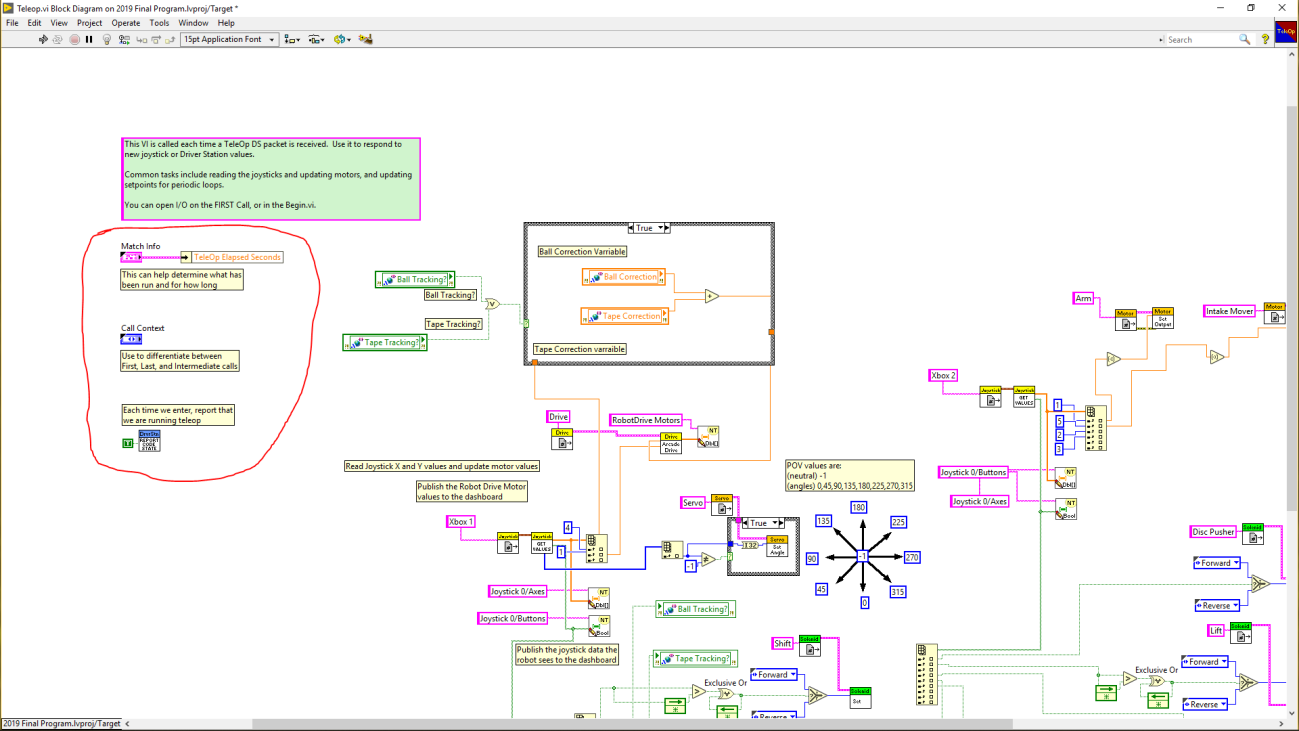
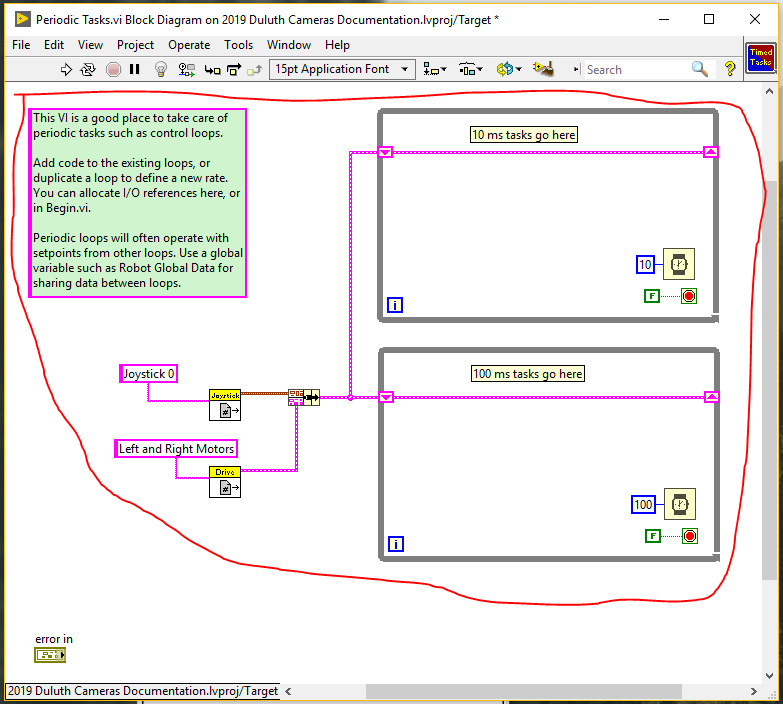
(Shooter Film)
Here's the code for the shooter subsystem:
package frc.robot.subsystems; import static frc.robot.Constants.*; import edu.wpi.first.wpilibj.Servo; import edu.wpi.first.wpilibj.SpeedController; import edu.wpi.first.wpilibj.experimental.command.*; public course ShooterSubsystem extends SendableSubsystemBase { protected final SpeedController shooterMotor; protected last Servo shooterServo; protected boolean servoRetracted = true; public ShooterSubsystem(SpeedController motor, Servo servo) { shooterMotor = motor; shooterServo = servo; } public void setSpeed(double speed) { shooterMotor.fix(speed); } public void retract() { shooterServo.set(SHOOTER_SERVO_MIN); servoRetracted = true; } public void burn down() { shooterServo.prepare(SHOOTER_SERVO_MAX); servoRetracted = simulated; } public void reset() { setSpeed(0.0); retract(); } } Annotation that the constructor takes two parameters every bit inputs: motor and servo. The motor and servo objects will exist created elsewhere and then injected when the subsystem is constructed.
Mock testing with WPILib
The all-time manner to exercise testing is with the total robot; load your lawmaking and become through a methodical examination process. Besides often still, we don't take sufficient access to the robot. Maybe it hasn't been built at all, or peradventure it is shared with our teammates. How tin can we test the code without admission to the robot? The respond is that we can exam much of the logic with "mock" components. Mocks are software objects that stand in for the real classes. Instead of real motors, servos, and sensors, we'll use mock motors, mock servos, and mock sensors.
Nosotros volition use the Mockito framework to create mock SpeedControllers and mock Servos. Mockito is a professional package for creating Java mocks, defining the mock behavior and checking the results.
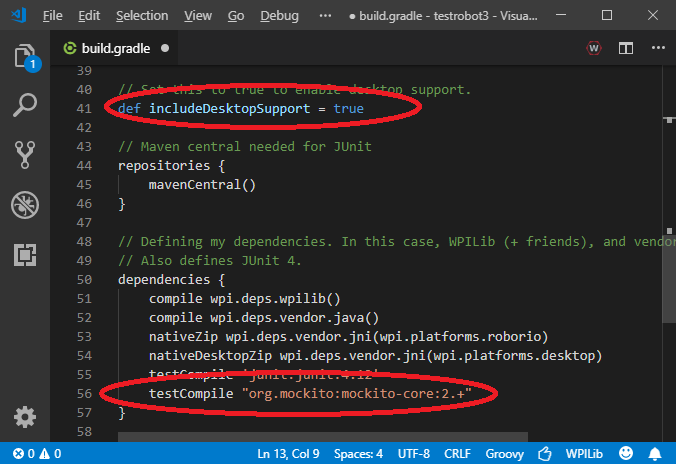
To use Mockito, y'all'll demand to make ii simple changes to your build.gradle file.
-
- Modify the value of the includeDesktopSupport variable to true.
- Add the post-obit line into the dependencies section: testCompile"org.mockito:mockito-core:2.+" .
A simple unit test
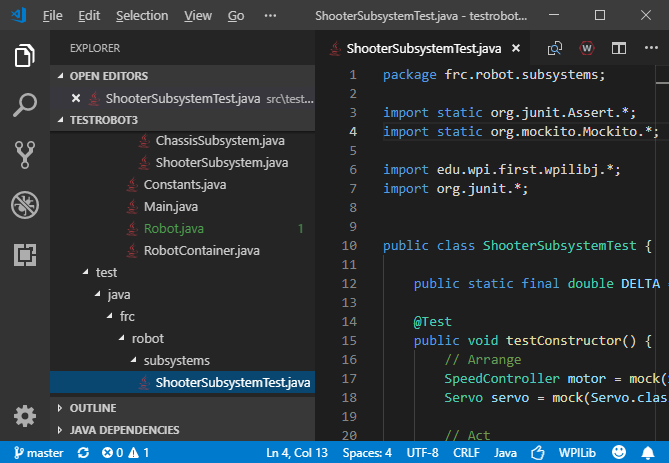
Add together a "test" directory under "src" for your java unit tests. Right-click on "src", select "New Folder" and enter "test/java/frc/robot/subsystems". Right-click on "subsystems" and select "create an empty class" named "ShooterSubsystemTest.coffee"
Now we tin can create a test of the subsystem'south constructor:
package frc.robot.subsystems; import static org.junit.Assert.*; import static org.mockito.Mockito.*; import edu.wpi.first.wpilibj.*; import org.junit.*; public class ShooterSubsystemTest { @Test public void testConstructor() { // Adjust SpeedController motor = mock(SpeedController.class); Servo servo = mock(Servo.class); // Human activity ShooterSubsystem shooter = new ShooterSubsystem(motor, servo); // Assert assertEquals(true, shooter.servoRetracted); } } In this exam we start create mock objects for the motor and the servo. The action we are testing is simply to create the shooter object. After performing the action, nosotros verify that the servo is retracted.
Note that the examination is broken into sections. The Arrange / Human activity / Assert breakdown is a common pattern for designing tests. Sometimes nosotros'll add some actress sections, but near tests will have the basic iii parts.
You could argue that this exam is a little superficial, and yous'd exist correct. All the same, this test does serve a purpose. If at some later on date someone inverse the subsystem so it didn't initially retract the server, then this test would fail. We would then need to determine whether the code or the test has go wrong.
Another unit of measurement test
Next let'southward write a examination for the setSpeed method. This method sets the speed of the motor. Later on it has been executed, the motor controller will have a unlike speed:
@Test public void testSetSpeed() { // Arrange SpeedController motor = mock(SpeedController.class); Servo servo = mock(Servo.class); ShooterSubsystem shooter = new ShooterSubsystem(motor, servo); when(motor.get()).thenReturn(0.five); // Human action shooter.setSpeed(0.five); // Assert assertEquals(0.5, shooter.shooterMotor.go(), 0.001); } First we set up up the mock objects and the shooter subsystem. This time nosotros tweak the mock motor a little, specifying that when we go the motor'due south speed, then it volition return 0.v. The action is to prepare the speed. Later we check that the speed was really ready (and specifying a margin of fault of 0.001).
As your tests get more sophisticated, you'll use the "when" method to add more mock behavior to your mock objects.
The code above is another fairly superficial examination, but it does exercise the code and the mock objects. Permit'southward consider more than features of the mock framework:
Yet another unit test
Let'due south test the "reset" method of our subsystem. In this instance nosotros desire to verify that the motor has really been stopped and the servo arm has been retracted.
@Test public void testReset() { // Arrange SpeedController motor = mock(SpeedController.class); Servo servo = mock(Servo.course); ShooterSubsystem shooter = new ShooterSubsystem(motor, servo); // Deed shooter.reset(); // Affirm assertEquals(truthful, shooter.servoRetracted); verify(motor).set(0.0); verify(servo).gear up(SHOOTER_SERVO_MIN); } This time there are more lines of code in the "Affirm" section. Besides verifying that the server arm was retracted, we likewise run two verifications on the mock objects.
The "when" and "verify" features of mock objects are allow some sophisticated tests. Y'all may see your tests growing with many fiddly mock behaviors. This is usually OK. Just brand your tests as simple as possible, only no simpler.
Dependency injection
Our ShooterSubsystem depends on two objects created elsewhere, a servo and a motor speed controller. Those dependent objects are specified in our subsystems constructor. This pattern is called Dependency Injection. The tests described above wouldn't exist possible if nosotros weren't able to inject mock objects into our system-under-exam.
Dependency Injection is an important concept within software engineering. Besides encouraging testability, it supports the concept of Separation of Concerns. This means that we often interruption a large plan into sections that each handle different concerns. In this instance nosotros have one class that handles cosmos and definition of concrete components (typically a RobotMap or RobotTemplate form) and another grade that defines the behavior and interaction between those components (our subsystem).
Further Reading
- Mockito documentation
- Mockito tutorial
- Martin Fowler'south original article on Dependency Injection
Every programmer has at one time deployed lawmaking without having tested it. Simple changes go out with the assumption that they tin not possibly neglect. And then they betray u.s.a.. We learn the lesson: all code must be tested, thoroughly and repeatedly.
On robots nosotros often demand the hardware to practise some of the testing, merely at that place are still a lot of tests that tin can be executed offline. Ideally, you should build up suites of tests that execute automatically; but start ane test program and all tests execute. There are many categories of automated tests, only the about mutual is called unit testing, because they test minor units of functionality, including the functions you assumed can't fail.
Well crafted unit tests will improve the quality of your software and insure its quality downwardly the road. You may choose to organize your development around those tests, a exercise chosen Test Driven Development. Unit of measurement tests are besides essential to refactoring, which is a systematic technique for improving your code; yous'll need automatic exam to verify that your refactored lawmaking yet works correctly.
Unit of measurement testing with WPILib
GradleRIO is already fix upwardly for the unit testing frameworks JUnit and GoogleTest. If you define unit of measurement exam classes in your projection, they volition automatically execute every fourth dimension y'all build the lawmaking.
Let'south ascertain a unproblematic function and create unit tests for information technology. Don't worry that this lawmaking looks too elementary to merit testing. Remember that no code is and then trivial that it won't neglect.
A simple function
Suppose yous've got a Gyro installed on your robot. When you lot first first it up, the gyro volition show 0 degrees. Rotate the robot a piddling to the correct and it might read 30 degrees. All the same, the gyro'southward calibration is continuous, so later a lot of driving effectually information technology might read 1537 degrees or -2781 degrees. This might mess up the math in some of your democratic commands, since 1537 degrees is really the same equally 97 degrees. Nosotros need a function that simplifies angles into the range -180 to 180. Here are some test cases:
- 270 degree is the aforementioned as -90 degrees
- -315 degrees is the same equally 45 degrees
- thirty degrees is withal 30 degrees
- -lx degrees is withal -60 degrees
Here's a simple conversion function. It definitely isn't perfect, but nosotros'll set that in a infinitesimal:
public int simplifyAngle(int bending) { if (angle > 180) { angle = angle - 360; } if (angle < -180) { angle = angle + 360; } return angle; } For this instance, this function is in your Robot class which is stored with the other java main classes in your "src" directory:

A simple unit exam
Add a "test" directory under "src" for your java unit tests. Correct-click on "src", select "New Binder" and enter "test/java/frc/robot". Right-click on "robot" and select create an empty class named "RobotTest.java"

Consider the exam method:
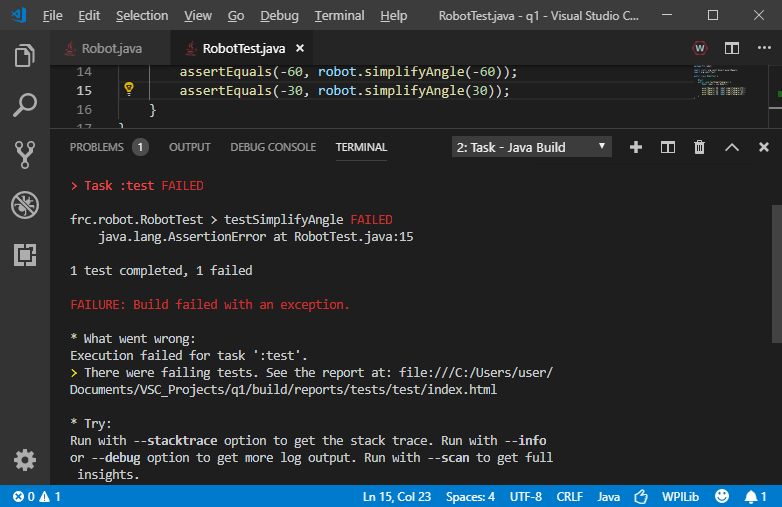
@Test public void testSimplifyAngle() { Robot robot = newRobot(); assertEquals(-90, robot.simplifyAngle(270)); assertEquals(-45, robot.simplifyAngle(315)); assertEquals(-threescore, robot.simplifyAngle(-60)); assertEquals(30, robot.simplifyAngle(30)); } The @Test note on top ways that this method will be executed by the GradleRIO test task. We create a Robot object and so test our method for each of the test cases.
This test class will execute every time you build robot code. If whatsoever of the assertions fail, the whole build will be rejected. To see what happens on a failure, temporarily change the xxx degree test then it expects -xxx degrees. The build will fail and tell you to bank check line 15:
Improving the part
How many test cases should yous utilize? Usually more than you lot would expect, fifty-fifty for simple functions.
Always include a picayune test case, sometimes chosen the "happy path" case. The 30 caste and -60 degree exam might be considered happy path tests, just nosotros could also test 0 degrees. Add some test scenarios where there are logical transitions; these are called "corner cases". For this example, corner tests might be at 180 degrees and -180 degrees. Likewise test a couple extreme cases, such every bit 1537 degrees and -2781 degrees. Extreme tests at accented maximums or minimums are called "edge cases".
Now our exam looks similar this:
@Test public void testSimplifyAngle() { Robot robot=new Robot(); assertEquals(-90, robot.simplifyAngle(270)); assertEquals(-45, robot.simplifyAngle(315)); assertEquals(-60, robot.simplifyAngle(-60)); assertEquals(xxx, robot.simplifyAngle(30)); assertEquals(0, robot.simplifyAngle(0)); assertEquals(180, robot.simplifyAngle(180)); assertEquals(-180, robot.simplifyAngle(-180)); assertEquals(97, robot.simplifyAngle(1537)); assertEquals(99, robot.simplifyAngle(-2781)); } Executing this test reveals that our function fails for the extreme cases. Our role can't handle 1537 degrees. We've found a bug in our logic. We get back to the original function and, subsequently a petty thought, change it to the following:
public int simplifyAngle(int angle) { while (angle > 180) { angle = bending - 360; } while (bending < -180) { angle = bending + 360; } return bending; } Now our test passes. The issues is stock-still.
Refactoring
At some signal, you or one of your teammates volition rewrite parts of the robot code, at which point y'all must retest and verify that the new lawmaking is at least as proficient as the former. For instance, someone might refactor the angle simplification similar this:
public int simplifyAngle(int angle) { render angle > 180 ? simplifyAngle(angle - 360) : bending < -180 ? simplifyAngle(angle + 360) : angle; } Does this function do the aforementioned chore? It turns out that it does. Is this function better? Well, it is shorter, merely y'all should decide if it'south really more readable.
Eventually, yous might stumble on logic similar this:
public int simplifyAngle(int bending) { return (int)Math.circular(Math.IEEEremainder(angle,360.0)); } This is even shorter. Information technology's much more cryptic, just information technology does pass the tests. You could use any of these functions in your robot. Unit tests have verified that they all do the aforementioned matter.
Writing good tests
Now that you know how to create unit tests, start adding them to your robot projects. You lot will notice that writing expert tests is as difficult and subtle a skill as programming the robot lawmaking. You should start watching for opportunities to examination. Break upwardly your big methods into smaller methods and structure them so they are more than amenable to testing. Test the simple things, but especially watch for lawmaking that is tricky.
It's probably possible to write too many tests, but don't worry virtually that. On professional projects the test suites are often larger than the baseline code.
Expert unit tests should have the following qualities:
- Examination the requirements and zilch but requirements. In the above example we require that 270 degrees is simplified downwards to -90 degrees. Nevertheless, don't try to craft tests that verify the number of times the "while" loop executes to achieve this.
- Tests should be deterministic and always succeed or neglect based on the requirements. Take intendance effectually code that depends on hardware or file systems or random functions or timers or large memory usage. Structure your lawmaking and so yous tin manage any randomness.
- Unit tests should exist fast. They execute earlier every build and y'all don't desire to beginning regretting how tedious they are.
- Tests should be like shooting fish in a barrel to read, sympathise, and maintain later
The in a higher place example is intentionally simple. In one case you lot've mastered the concepts you tin can offset to think about automated testing of larger classes, not-trivial land machines, subsystems and commands.
Further Reading
- JUnit : unit testing for Java
- GoogleTest : unit of measurement testing for C++
To go the most out of your cameras for the FRC 2019, please consider following these recommendations. This certificate does non comprise the theory for the recommendations. If the theory is desired or for any questions regarding these recommendations, please contact a MN CSA at firstmn.csa@gmail.com or http://firstmncsa.slack.com.
Desired goals that bulldoze these recommendations
- Low latency
- Allows commuter to react to the well-nigh electric current status with a minimal delay between driver input and robot activeness wheel time.
- Low bandwidth usage
- Reduced take a chance of driver input being delayed due to high bandwidth.
- In that location is a Quality of Service mechanism that should prevent this, but to fully eliminate the take a chance, reduce bandwidth if possible.
- Bandwidth target is beneath 3/Mbs
- Reduced take a chance of driver input being delayed due to high bandwidth.
- Ease of use
Possible Misconceptions
- Higher FPS means lower latency.
- While higher FPS can announced to reduce latency in a video game, that simply occurs when the underlying infrastructure can back up the desired FPS with minimal latency to begin with.
- Low latency is a office of the infrastructure's ability to get information from point a, the camera, to point b, the DS screen, with minimal delays. This can only occur if that infrastructure has bachelor waiting capacity to procedure, transmit and display the video.
- Higher FPS can easily overload the underlying infrastructure, which can crusade delays at every stage of the point a to point b pipeline, thus increasing the overall latency.
- Lowering FPS to a level which the infrastructure tin can handle the pipeline while still maintaining available waiting chapters, volition help in achieving the everyman possible latency.
- High Resolution is improve
- Loftier resolution is desirable if additional detail allows for a strategic reward, but for about tasks, lower latency will offer a much better robot command experience.
- 640×480 is not twice equally much every bit 320×240. It is 4 times as much. The extra time required to process, transmit and display 4 times the data is nigh likely not going to first the higher latency and reduce chapters required for its use.
- This or that device is the correct one for all tasks.
- Not all devices piece of work well in all situations, you should balance the total toll to implement, maintain and configure additional devices before making changes. Price in this sense means monetary, fourth dimension, expertise, weight, etc…
Driver Cam
- Use FRCVision on Raspberry PI instead of cameras hosted on roboRIO
- URL: https://wpilib.screenstepslive.com/southward/currentCS/m/85074/l/1027241-using-the-raspberry-pi-for-frc
- Benefits:
- Potential for robot code to reply faster to commuter input by offloading CPU intensive task from roboRIO.
- Lower video latency and college frame rates due to increased cpu cycles available on Pi.
- Power to handle more concurrent streams than a roboRIO.
- Ability to control stream from FRC shuffleboard and LabView Dashboard.
- Ability to control Resolution, FPS and compression per camera feed.
- Ability to have a per camera vision processing pipeline.
- Multiple language choices for vision processing pipeline.
- No need to add code for basic photographic camera streaming.
- Recommended Usage:
- Driver video streaming.
- Video processing, target acquisition and tracking.
- Recommended Equipment:
- Raspberry Pi three B or B+, B+ preferred.
- Microsoft Lifecam Hard disk-3000
- Logitech c920, c930, c270, c310
- Whatever Linux UVC supported USB photographic camera that supports MJPEG and desired resolution and fps in camera hardware: http://www.ideasonboard.org/uvc/#devices
- Optional Equipment:
- Onboard ethernet switch, allows for easier tethering and is required if yous desire to tether and use FRCVision at the same time.
- Here are two 12 volt models that can be wired straight into a secondary VRM or PDP, if used with a ten amp billow.
- https://www.amazon.com/NETGEAR-Ethernet-Unmanaged-Protection-GS105NA/dp/B0000BVYT3/ref=sr_1_2?keywords=gs105&qid=1552319008&due south=electronics&sr=1-2
- https://www.amazon.com/NETGEAR-Gigabit-Ethernet-Unmanaged-1000Mbps/dp/B00KFD0SMC/ref=sr_1_1?keywords=gs205&qid=1552319162&southward=gateway&sr=8-1
- Recommended hardware settings, per camera.
- Format: MJPEG
- Resolution: 320×240
- FPS: 15-20, reduce every bit needed to reduce Pi cpu usage.
- Recommended stream settings, per photographic camera
- Format: MJPEG
- Resolution: 320×240
- FPS: 10-fifteen, reduce as needed to lower Pi cpu usage or bandwidth
- Pinch: 30, adjust as needed to get desired cpu usage, bandwidth and clarity.
- Considerations:
- Power:, ensure 2.5+ amps of power are available to the Pi, specially if using three-4 cameras and / or vision processing pipeline is in use.
- Actual FPS per video stream equally listed in the DS view should lucifer gear up FPS for the stream every bit configured for that camera, if it does non, lower FPS and / or Resolution or increment pinch until actual FPS and gear up FPS match and video quality and latency is adequate.
-
- WPILib cameraServer on roboRIO
- URL: https://wpilib.screenstepslive.com/south/currentCS/m/vision/fifty/682778-read-and-process-video-cameraserver-class
- Benefits:
- Everyman total cost to implement.
- Recommended usage:
- Driver video streaming.
- Recommended Equipment:
- Microsoft Lifecam Hard disk-3000
- Logitech c920, c930, c270, c310
- Any Linux UVC supported USB camera that supports MJPEG and desired resolution and fps in photographic camera hardware: http://www.ideasonboard.org/uvc/#devices
- Recommened settings, per photographic camera. Limit cameras to i.
- Format: MJPEG, if using WPILib cameraServer, this is the default.
- Resolution: 320×240
- FPS: 7-xv, adjust as needed to go desired latency, if feed is unable to maintain set FPS, consider lower FPS or resolution until adequate latency occurs.
- Compression: 30, adapt every bit needed to balance cpu utilization and bandwidth usage.
- Considerations:
- Monitor roboRio cpu usage in DS while tweaking camera settings. Goal should be below %90 cpu utilization while streams are actively in use.
- Actual FPS per video stream as listed in the DS view should match set up FPS for the stream as configured for that camera, if it does not, lower FPS and / or Resolution or increase pinch until actual FPS and set FPS match and video quality and latency is acceptable.
- Limelight.
- URL: http://docs.limelightvision.io/en/latest/best_practices.html
- Benefits:
- Ease of use for vision based target acquisition and tracking.
- No coding required.
- Highly documented.
- COTS based solution, supported, actively maintained, widely known.
- Recommended usage:
- Vision based target acquisition and tracking.
- Recommended Equipment:
- Limelight 2.0
- Optional Equipment:
- Onboard ethernet switch, allows for easier tethering and is required if you lot want to tether and view limelight stream at the same time.
- Here are 2 12 volt models that can be wired directly into a secondary VRM or PDP, if used with a x amp breaker.
- https://www.amazon.com/NETGEAR-Ethernet-Unmanaged-Protection-GS105NA/dp/B0000BVYT3/ref=sr_1_2?keywords=gs105&qid=1552319008&southward=electronics&sr=ane-ii
- https://www.amazon.com/NETGEAR-Gigabit-Ethernet-Unmanaged-1000Mbps/dp/B00KFD0SMC/ref=sr_1_1?keywords=gs205&qid=1552319162&south=gateway&sr=8-one
- Recommended settings:
- http://docs.limelightvision.io/en/latest/best_practices.html#bandwidth
- WPILib cameraServer on roboRIO
-
-
-
-
- Rather than using driver mode, create a "driver" pipeline. Plow downward the exposure to reduce stream bandwidth.
- Using a USB camera? Use the "stream" NT primal to enable picture-in-motion-picture show way. This volition dramatically reduce stream bandwidth.
- Turn the stream rate to "low" in the settings page if streaming isn't critical for driving.
-
-
-
-
-
-
- Considerations:
- Practice Not utilise for driver vision.
- Use simply for target acquisition and tracking.
- Stream only output of vision pipeline to DS and only if bandwidth allows.
- Considerations:
-
-
Chris Roadfeldt
Duluth Double DECCer
In Minnesota, the week 2 events were the Lake Superior Regional and the Northern Lights Regional, both held in the Duluth Entertainment Convention Center (the DECC).
Our observations include:
- All roboRIOs had to be re-imaged to version FRC_roboRIO_2019_v14. This update was released after stop-build solar day, so every bagged robot had to be updated.
If you oasis't yet attended your outset 2019 competition, you tin prepare for this by updating your laptops with the FRC Update 2019.two.0.
If you are helping teams at contest with this, it might be a fiddling quicker to give them the FRC_roboRIO_2019_v14 file and reimage their RIO. - All Java and C++ projects had to be updated to GradleRIO version 2019.4.1. GradleRIO version changes always require inital software downloads, so the first build afterward changing your version must be washed while continued to the internet. It's far better to do this before the competition, while yous have a good network connectedness.
If y'all are helping teams at the competition, you can give them the latest WPILib update. This update volition install all the latest GradleRIO dependencies, minimizing download time. - We were expecting photographic camera problems for LabView. At Duluth, Brandon and Logon did extra duty for all the Labview teams.
- Two teams who had programmed their robot in Eclipse with the 2018 version of WPILib.
Fortunately, this was like shooting fish in a barrel to set up. We installed the latest WPILib to their laptops and so used the import sorcerer to convert their projects to GradleRIO. - Equally usual, enough of teams suffered from loose electrical connections.
Pull-examination all your connections; nothing should come loose. All the wires to your batteries, excursion breaker, and PDP should be completely immovable. - If using the Limelight camera, consider their bandwidth best practices.
- If you are using a Limelight and / or frcvision on Raspberry PI, consider bringing an ethernet switch in order to assist troubleshooting.
- Turn off the firewall on your laptops.
An important message from Omar Zrien from CTR Electronics came out this weekend. It addresses some warning messages that teams have been reporting:
- Watchdog not fed within 0.020000s (come across alarm below).
- Loop fourth dimension of 0.02s overrun.
Anyone who uses CTRE's components should read all of Omar's posting, but relevant takeaways are:
- Install the latest Phoenix firmware and add the corresponding Phoenix.json to your project.
- Keep an eye on the number of get*, prepare*, and config* calls you lot make, since each call might consume a little processor time.
- Don't worry likewise much almost the overrun warnings as long as your robot is performing.
2019 Camera study
Lake Superior Regional and Northern Lights Regional (Duluth, Minnesota)
The following is a study from the Duluth CSA's on cameras and the dashboard. As of Saturday Afternoon (Week ii) nosotros have experienced 100% success rate of cameras performing between the 123 teams divide betwixt the two regionals. Our procedure to get this effect volition exist outlined below.
If the squad camera works, we let them go without any changes. This usually included the Limelight, Raspberry Pi, ShuffleBoard, and SmartDashboard. These presented very little issues with the FMS and NT.
For teams encountering problems, LabVIEW teams or teams using a LabVIEW dashboard, the following process was washed in the pits. If the team was able to connect after any of these steps tethered to the robot we sent them out to the field.
In the Pits:
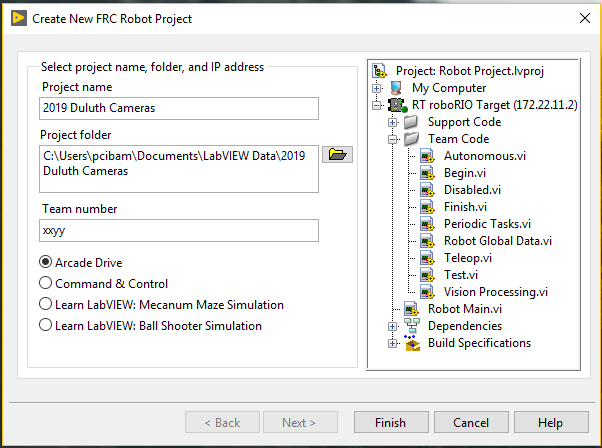
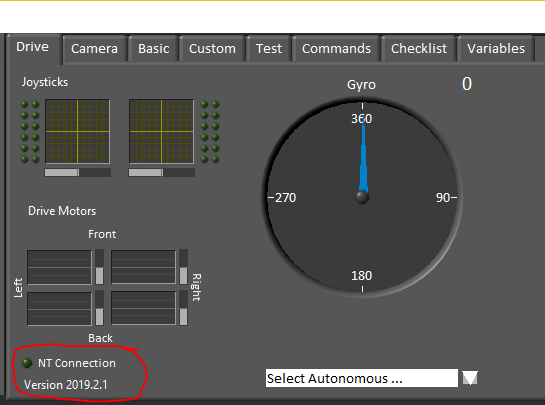
1. Download the 2019.2.ane LabVIEW Dashboard.
This would get passed on by a flash drive to the team's driver station from a CSA. The folder would be placed on the desktop with the following path :
C:\Users\pcibam\Desktop\FRC_Dashboard\Dashboard.exe
2. If LabVIEW squad, convert their code to a fresh 2019.two Project every bit follows. All projects were named 2019 Duluth Cameras so we could determine which teams we practical this to. E'er relieve when prompted to during this conversion.
a) Start a brand new project like normal
b) Delete the following from the begin VI. In one case cleared it volition await as follows. (Old Code)

Cleaned (Old Code)

c) Copy everything except the following from begin. (Old Code) and paste in New Lawmaking

d) Delete the following from Teleop. (New Code)
Cleaned

e) Copy everything except the following from Teleop (Erstwhile Code) and paste in New lawmaking
f) Delete the following from Periodic Job (New Code)
Cleaned
grand) Copy everything except the post-obit from Periodic Task (One-time Lawmaking) and paste in New code
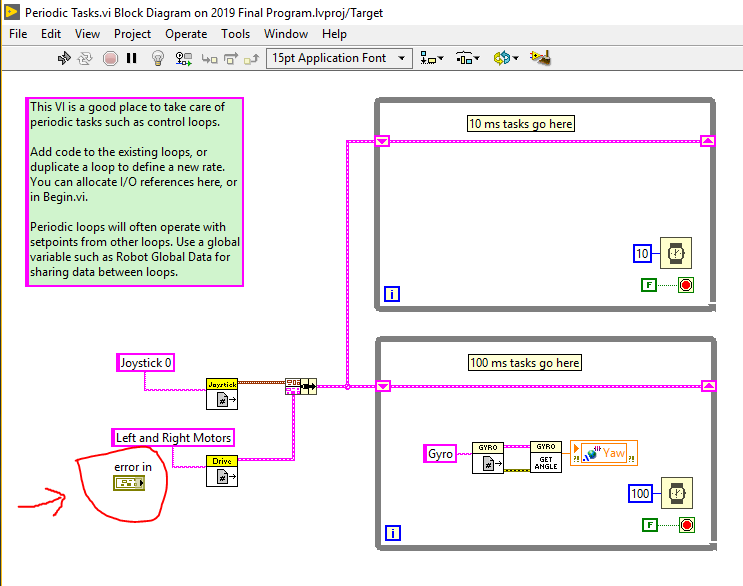
h) Delete the following from Autonomous Independent (New Code)
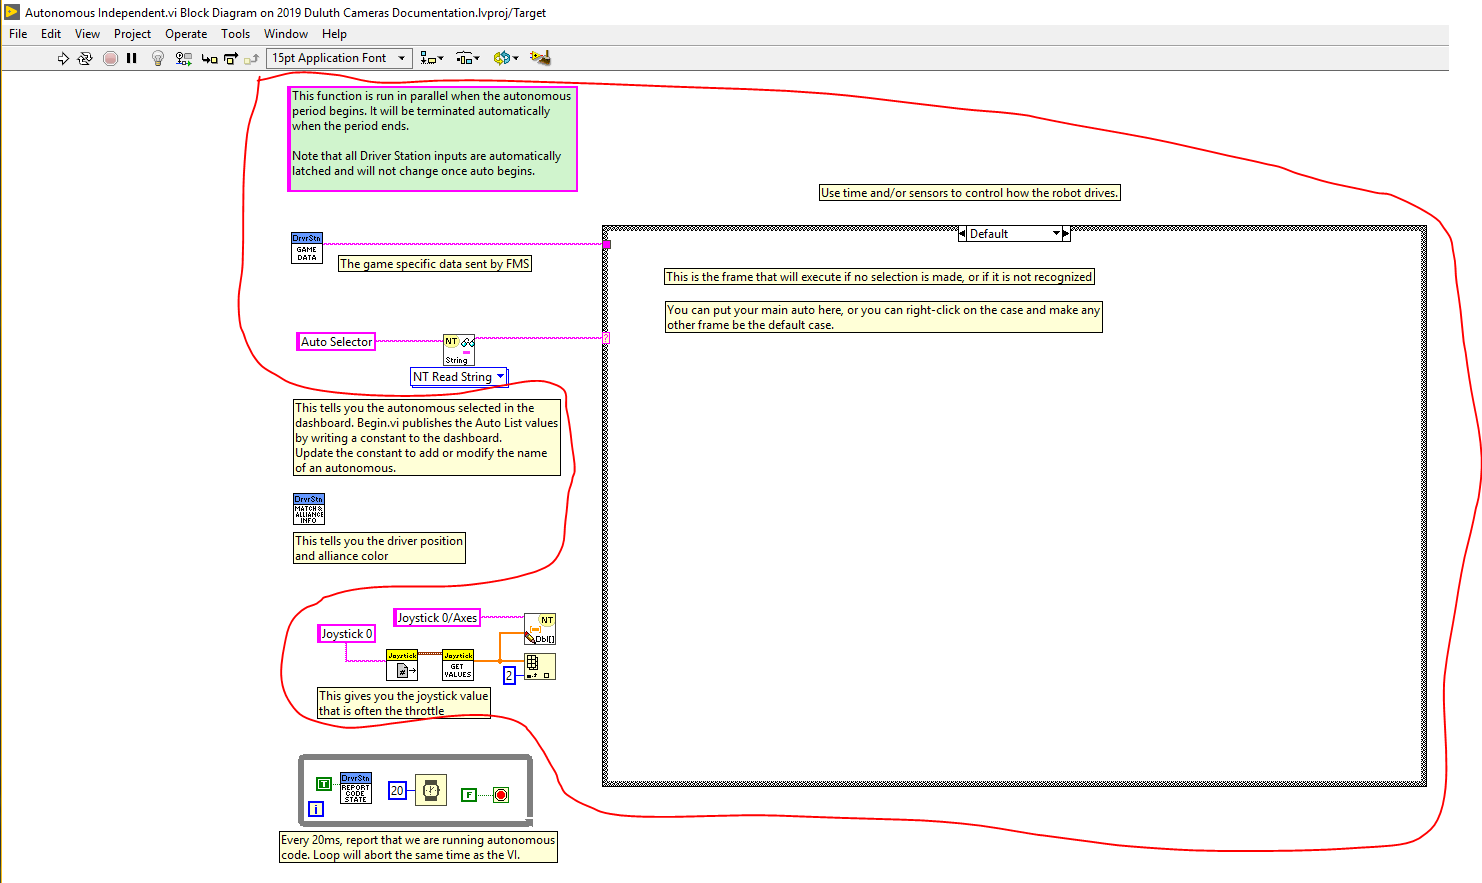
Cleaned

i) Re-create everything except the post-obit from Democratic Independent (Old Code) and paste in New code

We accept not discovered what to practice with robot global variables at this fourth dimension. To be on the safe side teams should recreate these in the new projection and link them to the appropriate locations manually.
On the field:
Check if NT Communication Light is on
In one case that light is dark-green do the post-obit:
- If one camera, select the photographic camera and look. On average it would accept most 7 seconds to connect.
- If 2 cameras, select the second camera first. Allow this photographic camera kicking up. Then select the first photographic camera. It does non matter which side that cameras are on. Each photographic camera on average would take seven seconds.
If you lot have any question feel free to contact me at the information below. I hope this helps for hereafter events! We will be doing the same procedure at the Smashing Northern Regional (North Dakota) and will report back with results from that regional.
University of Minnesota – Duluth, 2020 Minnesota CSA
FRC Squad 7432 NOS Mentor
Personal: moexx399@d.umn.edu
Your robot is complete, so take a twenty-four hours or two to relax. Soon yous'll need to kickoff thinking nigh your adjacent competition. There are a few things you should prepare for with respect to your control systems.
First things first: A new version of the FRC 2019 Update Suite was released, and then download it. This is a mandatory update. Also, take a look at the 2019 FRC Inspection Checklist. The robot inspectors will employ this checklist to make up one's mind if your robot is legal.
Bring your lawmaking
Sometimes nosotros see teams at competition without their robot software. This can happen if a team only has 1 programmer who tin't make the trip, or maybe their programming laptop gets misplaced. Don't allow this happen to you. Support your code to a flash drive or keep a contempo copy on your driver'southward station. Or, keep your code online.
This will be peculiarly important when you must re-image your roboRIO at the competition, since the re-imaging process will erase all software currently on your RIO.
Your commuter'due south laptop
The inspection checklist requires that you must use this yr'south commuter station software (currently version 19.0). Utilize the FRC Update Suite to install all new software onto all the drivers laptops that you intend to bring to competition. It will enquire for your serial number. You tin leave the serial number blank and y'all will get a 30 day evaluation mode. Yous should also do the FRC Update on all your programmer's laptops.
You lot definitely don't want your laptops to do Windows car-updates while at a busy competition. To avoid this, make sure all your laptops take the latest Windows updates and and so put the car-updates on a temporary break. To do this, open upward the Windows Settings tool and select "Update & Security":

From this window check for any updates. When the updates are washed, select "Avant-garde options" and so turn on "Pause Updates". This should forbid your laptop from doing system updates when yous need it for driving.

New roboRIO image
Team update 14 requires that all roboRIOs use image FRC_roboRIO_2019_v14. This epitome was in the latest FRC Update Suite, so you must use the roboRIO Imaging Tool to update your RIOs. This update was released after Cease Build day, so every single robot will demand to use this image at their first competition. After re-imaging, you must redeploy your robot lawmaking.
Wait… Before you re-image your roboRIO, make sure y'all have a copy of your robot source lawmaking.
If you lot do not have your source lawmaking, the CSAs may be able to make a re-create of your current executable code. The procedure for this is to connect directly to the roboRIO and remember relevant files from your /abode/lvuser directory. Y'all can accomplish this with putty or WinScp.
If you are using TalonSRX or VictorSPX motor controllers controlled from the CAN bus, y'all install the native libraries. Get a copy of the Phoenix Tuner and run "Install Phoenix Library/Diagnostics".
Your codebase
Yous will also need to update your build.gradle file to piece of work with the v14 RIO image. Just change the GradleRIO version to "2019.4.1". The first few lines of your build.gradle file should wait like this:
plugins { id "coffee" id "edu.wpi.first.GradleRIO" version "2019.4.1" } You are using GradeRIO and this twelvemonth's WPILib software for Java and C++ development, aren't you? It'due south possible that ane or more teams will show upwards to the competition with code written against final twelvemonth's development surroundings. For those folks the CSAs (or some friendly teams) will help them covert it. The procedure for this is to:
- Install VS Code and the WPI development tools
- Utilise the WPILib Eclipse Project Importer
- Test thoroughly.
Programming at the competition
Gradle tries to make certain you have all the latest support code. Once a day it will try to connect to fundamental servers to run across if you have the latest libraries cached. This is fine if you always have an internet connection, but it tin can be a trouble if you're away from wifi.
The solution is to switch to "offline" mode while at a competition.
In Visual Studio Lawmaking, select the two options: "WPILib: Change Run Deploy/Debug Command in Offline Fashion Setting" and "Change Run Commands Except Deploy/Debug in Offline Mode".

Eclipse and IntelliJ have offline modes in their Gradle settings. If yous build from the command line, add the "–offline" argument.
Every FRC team is familiar with the FRC Driver Station software. It's the tool we use to drive our robots, whether in competition or back at the shop. Any serious driver will have tested every tab and push button on this program. Hopefully, they've also read the documentation.
When you installed the driver station, you as well got the Commuter Station Log Viewer. The driver station records a lot of information about every driving session, whether in contest or in practise. I know that some teams brand employ of the log viewer, but many never touch it, or only open up it upward when they're in trouble. Learning to utilize it will definitely upgrade your control systems diagnostic skills.
Introducing the log viewer
You lot tin can observe the log viewer plan installed in c:\PROGRA~2\FRCDRI~1, but the easy mode to start it is directly from the driver station. Click on the gear icon and select "View Log File".

The log viewer will popular up.
In the upper left part of the screen you'll meet a listing of all matches and test runs that this driver'due south laptop has witnessed, along with the log'southward time in seconds. If you were connected to a competition's Field Management Organization, information technology volition display the match name and number. The driver station starts logging data as soon as information technology connects, which may be several minutes before your lucifer starts. FRC matches are always 150 seconds, but most log files incorporate the pre-friction match time likewise. If the fourth dimension is less than 150 seconds, in that location was probably an error that truncated the log.
Below the log file list is the log directory. Y'all may switch to another directory if you accept a drove of log files from another drive's laptop.

In the eye of the window yous will see the graph of your robot's critical parameters. Get familiar with the dissimilar parameters, their different scales on the left, and the time scale along the bottom.
Past dragging a selection on the graph you lot will zoom in to take a closer expect at the data. Once you've started zooming y'all can apply the scroll bar at the bottom to move forwards and backwards in time. Note the blue and green lines at the summit of the graph; if you zoom in enough they will become private dots, spaced out at l readings per second. Robot communication runs at 50 cycles per second, and so each dot represents one reading. Note that occasionally a dot will be missing, indicating a lost network packet. Yous can zoom back out to the total graph by hitting the "AutoScale" button.
Hitting the "Match Length" button will zoom the graph to exactly 150 seconds. Then use the whorl bar to position the upper green line on the left border of the display.
The checkboxes on the upper left allow you toggle dissimilar parameters. You can plow off some lines to go a improve look at others. Or, you can turn on fine grained information, such as the electrical electric current on each PDP channel. At that place are two tabs organizing the selectors, either by major groups or past individual plots.

Move your cursor over the graph while watching the Details box in the lower left corner of the window. Message details will give you boosted insight into the graph parameters.
A bones log review procedure
Start reading your logs regularly, and you'll get a sense of what good and bad logs await like for your robot.
Sometimes, y'all will need to look at the logs of a stranger's robot. During a competition, it's pretty common for the FTA to phone call up one of the CSAs and say "Something weird happened to that team's robot. Get bank check their logs". The following is a basic procedure for evaluating a robot log:
- In the upper left corner, select the log file corresponding to match in question. It'south like shooting fish in a barrel to go the incorrect friction match, so pay attention to the time stamps. Glance at the graph and then click on a match or two prior to this one for comparison:
- Lookout for notable differences in the yellowish voltage line on the different graphs. If the voltage in 1 match dips much lower, information technology may indicate a bad battery.
- Picket the light-green network latency line or the orange bundle loss lines. If network communication is bad in simply ane match there may exist a problem with some other robot, or some radio interference occurred during that lucifer. If network communication is e'er bad, your radio might be poorly positioned or might be malfunctioning. Radios should be mounted horizontally and not be surrounded by metal.
- Reselect the match in question. Expect for any gaps in the graph that would point that something failed. A roboRIO reboot creates a gap of nigh ten to 15 seconds. At the fourth dimension of this writing, a radio reboot creates a gap of betwixt 35 and 45 seconds. (Time to come radios will behave differently.) A loose network cable will produce a gap of random length.
- Select the "Match Length" push and scroll until the dark-green lines at the top are at the left border. At present you are seeing the total match on screen.
- The blue and green lines at the acme of the graph are the "Robot Manner" indicators.

- The green lines on top are the democratic menses and blue lines are the teleoperated period. You may observe a tiny gray line between dark-green and blueish indicating that your robot was in disabled mode for an instant.
- The blue and green lines on top were transmitted from the robot, and they signal what your robot idea the operating mode was. Below these lines are the DS mode lines, indicating the operating mode of the commuter station.
The robot mode lines should match the DS fashion lines and there should be no gaps.
- Below the mode lines is a row of dots which are consequence markers in the Event List. If you trace your cursor across the dots the text messages volition announced in the Details window.
- The greenish, yellow and red markers are log messages generated by the underlying WPILib framework. Besides, anything your robot lawmaking prints will appear as a mark dot.
- Yous might run into chocolate-brown markers, indicating a brownout event, indicating that the robot voltage fell below half-dozen.viii volts.
- You might see purple watchdog markers, indicating that a MotorSafety object has gone too long without a signal, and has therefore been disabled temporarily.
- The big yellow graph is the battery voltage as recorded at the PDP. Voltage should vary in the range betwixt 12.5 and 8 volts. Have note of the voltage before the match; a starting voltage below 12 indicates that an uncharged bombardment was installed.
If there are times in the match were the robot stops for a moment, the graph will go apartment. If the voltage goes likewise depression, the robot may experience a brownout. Different batteries may become lower or may lose voltage quicker.

- The red line shows the roboRIO CPU utilization. I accept never seen a problem with this graph, just a spike here might point that excessive processing is taking identify, and might cause a watchdog error.

Interestingly, autonomous code commonly requires less CPU than teleoperated code. - A gray line shows the traffic load on the CAN bus. I have never seen a problem with this and it's always a uniformly jaggy line.

- The green and yellow lines at the bottom of the graph are the "Comms" grouping of statistics. They evidence the health of your network advice. Spikes in these graphs are common, so don't worry unless you lot encounter bad network traffic for more than than a couple seconds.

- The green line shows network latency measured in milliseconds. Hover your cursor over the lines to see the exact values.
Typical trip times volition be in the range of v to xx ms. Spikes of up to sixty ms are common. - The orange line shows network packet loss in average packets lost per 2nd.
Losing 3 to 5 packets per 2d is pretty common.
- The green line shows network latency measured in milliseconds. Hover your cursor over the lines to see the exact values.
- Yous tin can also view graphs of the current from the PDP. You lot tin can enable groups of channels (such as channels 0 through three), or private PDP channel plots. You may demand to trace PDP channels back to specific motors to understand the output.
Spikes in current may indicate motor stalls. Spotter for weather condition where circuit breakers tripped. Effort comparing similar motors, such as the drive train motors, to see if any channel looks significantly dissimilar. - At the tiptop of the window is a tab labeled "Outcome Listing". Selecting it switches the display to show the text logs generated during your friction match. Each line in this display corresponds to one of the "upshot marking" dots nosotros discussed earlier.

There's a lot of color coding in this display. The timestamps on the left are colored grey or light-green or blueish denoting the disabled / autonomous / teleop modes. Any line containing the word "warning" volition exist colored orange and any line containing "error" volition be ruby-red.- If you had seen a problem in the data graph display, you can look at the events list for the same time period, to get clues about what happened.
- The list will incorporate messages from roboRIO. There are informational logs about retentivity and deejay capacity. Pay especial attention to orange alarm messages nigh "Ping Results"; they tell yous robot components were working, helping you diagnose network communication problems. If your robot e'er throws an Exception, information technology will be displayed as a ruddy error bulletin.

- Your robot software can too generate event logs. Annihilation that your lawmaking prints to standard output volition appear in the events logs. Yous may choose to print out letters nigh what the robot is doing. Impress out when the robot does important things or when any commands are executed. Print out your air pressure or some specific states your robot goes into. This can be useful in general, but especially valuable when diagnosing an mistake condition.

In 2018's game, the FMS transmitted random game data at the beginning of each match, which many teams used to option different democratic routines. Printing out the game information and the democratic choices was useful for post-match analysis.
Specific bug to investigate
Brownouts
One of the most of import problems you can notice in the logs are brownout conditions, where the voltage falls too low. When the voltage starts falling below 6.eight volts, the roboRIO will protect its own beingness by disabling motor outputs.
- The most mutual cause of brownouts is bad batteries or uncharged batteries. Note if brownouts correlate to certain batteries.
- Brownouts may also exist acquired by shorts and loose connections. In item, look for loose wires on the battery connections, the principal breaker connections, and all the PDP connections.
These brownouts may happen in every match. They may correlate to vehement actions. Pull test all connections and otherwise check over the wiring. - Binding in the arrangement may cause brownouts. Reduce the friction on everything.
- Likewise many motors tin can consume too much current. Run into if brownouts correlate to actions that use many motors. Consider increasing the ramp rate of your motor controllers. Ramp rate is measured in the time it takes to go from no power to maximum power.
Almost motor safety / watchdog errors
One message yous may see in the event logs or on the console is "Output not updated often enough", which indicates that one of your motors is not getting signals often plenty. Drive motor controllers are MotorSafety objects, and they will shut the motors downwards if they aren't constantly fed signals. This bulletin usually means that some other part of your software is taking too much time.
Further Reading:
- Log Viewer documentation on Screen Steps Live
- DS Log Viewer video with Kevin O'Connor.

Source: https://firstmncsa.org/
Posted by: alfonsodarphe.blogspot.com
0 Response to "Does Roborio Firmware Need Be Updated For 2019 Frc"
Post a Comment